Image may be NSFW.
Clik here to view. Q: How do I make a Recovery Drive for my Microsoft Surface RT?
A: Microsoft’s Surface RT runs Windows RT, which looks like Windows 8 but behaves slightly differently in often unexpected ways.
For example, the Surface RT includes a traditional Windows desktop, but it can’t run traditional Windows desktop programs. And since the operating system comes pre-installed, there’s no way to boot an ailing Surface RT from a DVD.
So, after you’re through admiring your new Surface RT’s flashy colors, create a Recovery Drive: A USB flash drive of at least 4GB that contains the files Windows RT needs to run, even if its system files are missing or damaged. (A 4GB USB drive costs about $5 on Amazon.)
To create a USB Recovery Drive on a Surface RT, follow these steps:
- From the Start screen, tap the Desktop tile to open the Windows Desktop.
- Slide your finger in from the right to fetch the Charms bar, then tap the Settings icon.
- When the Settings Pane appears, tap the words Control Panel from the pane’s top edge.
- When the Desktop Control Panel appears, tap the System and Security section, then tap File History.
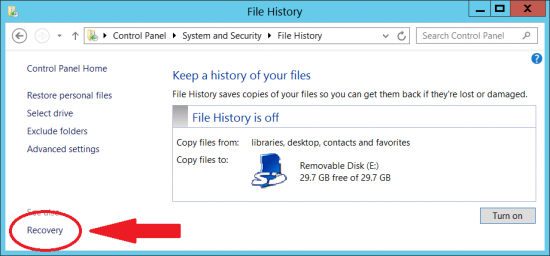
- When the File History window appears, shown below, tap Recovery in the bottom, left corner. Then tap Create a Recovery Drive when the Recovery window appears.
Image may be NSFW.
Clik here to view.
The program walks you through inserting a USB flash drive of 4GB or larger into the Surface RT’s lone USB port. After formatting the USB flash drive, the program copies the Surface’s recovery partition to the flash drive, creating a Recovery Drive.
Addendum: After copying the recovery partition to the USB drive, the program offers you the option of deleting your Surface RT’s recovery partition. Although this frees up almost 4GB of storage space on your Surface, I don’t recommend it. If you ever lose or damage your USB Recovery Drive, you’ll no longer have the recovery partition to bring your Surface back to life. Before deleting the recovery partition, decide what’s more important to you: more storage space, or a stronger safety net.
Using the USB Recovery Drive
Later, if your Surface doesn’t load properly, follow these steps to boot from the Recovery Drive:
Warning: Following these steps will reset your Surface RT to factory conditions, just like the Surface’s Reset command. Use this as a last resort.
- Turn off your Surface, then insert the Recovery Drive into your Surface RT’s USB port.
- While holding down the Volume Down switch, press and release the Surface RT’s Start button.
After a minute or two, the Surface RT wakes up and loads from the USB Recovery Drive, leaving you at the opening screen, shown below.
Image may be NSFW.
Clik here to view.
Hopefully, you’ll never have to use this Recovery Drive. But if your Surface RT ends up in trouble, the Recovery Drive just might be the thing that brings it back to life.
Image may be NSFW.
Clik here to view. For more Surface information, buy my book, Surface For Dummies, available for pre-order now on Amazon.
